Showing posts with label tutorial. Show all posts

Tuesday, October 30, 2012

Halloween Eve's Blast from the Past!

I am busier than a hungry zombie trapped in a brain repository. After work I have to put some last minute touches on the haunt, get treat bags ready, and do the no snow/rain dance into the wee hours of the night. Hop you all are having a safe and enjoyable Halloween Eve!

Here are the top 5 most viewed, shared, and discussed posts from Something wicKED this way comes. ENJOY!

Here you will find the most used recipes served at every wicKED weeKEnD Halloween party!

This is the ultimate party guide for throwing one of the wickedest bashes of all. If you need help planning your first Halloween party, or you are an old pro looking for some new ideas....this is the guide for you!

Pictures, video, and media from last years haunt. Check it out to get an idea of what to expect from us this year.

If you have ever had a friend of family member ask you this questions...forward this article to them! Tell em wicKED says hi!

Number 1 by a LANDSLIDE. The absolute most viewed post on this blog is one created by my very own Haunted Honey...M!

M does all our zombie makeup for the yard haunt. This tutorial can be used on your face as well. 

I hope you enjoyed this walk down blog memory lane. May your Halloween be truly wicKED!

Wednesday, October 10, 2012

A wicKED opinion on yard haunt lighting.

I have spent a lot of time, money, and effort in lighting over the years at the Wicked Woods. I have had many questions about what kind of lighting, color, and placement. I figured I would just go over some basic experiences I've had with lighting. I will list some pros and cons for each.


When I first started, I was using incandescent "party" bulbs and incandescent colored flood lights. This is a basic bulb that has a colored paint over them. There are several problems with this:


  1.  Heat! They get very hot! So you have to watch about materials getting close to them. I have had many a creepy cloth, foam head, or wooden coffin lid smoke and even catch fire because the wind whipped the light too close. 
  2. Washed out color. You never get a true color with incandescent. Green looks almost minty. Red looks orange. Blue looks sorta greenish. They all have a bright white overtone to them.
  3. They fade, crack, and peel so easy! What little color you get from them wont last. It will get worse as you use them. Constantly heating them up and cooling them off causes cracks, and peeling as well. 
  4. Delicate! I have broken so many lights just putting them in the haunt...I don't even want to talk about it! If you go with this kind of light, be prepared to replace them due to breakage, color peel, and just plain old burning out!
  5. "Black Light" bulbs just plain suck! 
There are a couple of good things about them such as:

  1. They are cheap. Very cheap comparatively speaking!
  2. They are available all over.
Green incandescent party bulbs.

Green incandescent flood lights. They just don't do the job and look sort of "minty"
A standard "green" floodlight and a standard "red"floodlight failing miserably.


I dealt with these kind of bulbs for a few years and then last year decided to upgrade.

2011 was the year I switched over to florescent and, over all, was pleased. They have a few downsides such as :


  1. They cost a good deal more. Sometimes 5X or more what you would pay for a regular party bulb.
  2. They are not as delicate as incandescent bulbs, but still require to be handled with care
  3. The spiral bulbs sometimes will not fit in lamps that held standard light bulbs. The lamp fixture that holds the shades sometimes touch the bulb making it impossible to screw it in. 
  4. Not as easy to find as standard bulbs.


The plus side to these bulbs far outweigh the negative such as:

  1. They last a lot longer.... I mean a lot longer! Sometimes you pay 5x the price of a regular bulb, but you will get at least 5x the service.
  2. Color is much MUCH better. Very vivid and almost true.
  3. Light radius is HUGE and they are bright (sometimes too bright)
  4. Much cooler to the touch. No worries about burning prop hair with these.
  5. They use a mere fraction of the power that standard bulbs d0.
  6. The "Black Lights" are hands down the best for UV reaction. 
Fluorescent bulbs gave me some beautiful eerie scenes but notice behind the tombstone that they are sometimes too bright.

It only took a few spiral bulbs to paint the whole haunt in color.

I really enjoyed using all florescent bulbs in my haunt last year, but sometimes the colors were just too bright, or not the true color I was looking for, which brings us to 2012!

I did a major overhaul with the lights and went with LED spotlights. So far, I am pleased with the change but they all have ups and downs. Some of the downs are:


  1.  PRICE. Be prepared to pay out for quality lights
  2. Availability. I tried to order some of these last year. I put the order in July and got them in November. You will mostly be ordering these online or paying out the wazzoo at Spirit Halloween.
  3. The black light is almost as bad as iridescent bulbs. It is not really a black uv light but more of a very creepy purple! 

The upside of these guys is huge:


  1. Durable. Good luck TRYING to break them
  2. Coolest running lights hands down.
  3. Longest lasting lights.
  4. Lowest power consumption.
  5. The truest, most vivid colors hands down.
  6. The spot lights are great at washing a scene in color without lighting up the whole place.


Notice the vivid color while not lighting up the entire area.

The LED spotlights are great at highlighting props and leaving pockets of dark in between.

This is an example of the "black light" LED It is really just a purple light.

I use a good combo of both florescent and LED bulbs in the haunt. The incandescent bulbs are now dead and buried.


A florescent black light underneath and a blue LED spotlight from above.
So in a nutshell, if you are serious about your lighting, get rid of the standard bulbs. For the most vivid and containable lights, go for LED. For lighting large areas go florescent  If you need a "black light" do yourself a favor and just get the long tube florescent ones. They are absolutely the best... and I know a thing or two about UV reactive stuff :


I hope this little tour on lighting has helped you in some way. It is nowhere near as concise as I would have liked it to be, but time is on short supply anymore for old wicKED! 

Tuesday, October 25, 2011

How to zombify your hand with toilet paper in 15 minutes.

   By popular demand, Miranda showed me her step by step for zombie makeup. Using toilet paper and Elmer's glue as the primary base she transformed my hand in just 15 minutes! For this tutorial, she only did one of my hands. This is the same application she will be applying to my face for Halloween. I am paraphrasing most of the post from my haunted honey so I hope I get it right. Keep reading to see how you can make your hand look like this :


   First, you need a hand. As luck would have it, I have two :
The scars and scratches are real and honestly earned from working on Halloween props.
 You are going to need a few things :
  1. Toilet Paper (make sure it is the high end stuff or it will tear and give you fits)
  2. Paper Towels
  3. Vaseline
  4. Foundation (The lightest you can possibly find)
  5. White face powder or baby powder (M says baby powder works best)
  6. Black water based craft paint
  7. Fake Blood
  8. Elmer's Glue
  9. Makeup Brush
  10. Halloween Makeup (M says this is the 1 dollar Walmart kind. Brown, Green, Flesh and White)
  11. A toothpick
  12. A Styrofoam or paper plate
  13. Applicator sponge
  14. 1 small paint brush
  15. One small cat in a purple Halloween T-shirt. (This is very important. Details to follow!)


 Prep your pallet:
Miranda has mixed the Vaseline, white Halloween makeup, and a drop of black craft paint  to make her base grey color (If you want a dryer makeup application, omit the vasaline and use the lightest foundation you can find). She has the flesh, green, and brown makeup out and a drop of fake blood ready for the hand.
 Glue your hand :
You may want to test to make sure you are not allergic to glue before proceeding. 

Smear it out evenly.
  Apply TP:
place the sheet of TP over the glue. Pinch and crease it to make it look like veins, works, wrinkles, bones, or just desiccated flesh and wounds.

For this tutorial. we are going with rotted flesh flapping over wounds. The smear of red was M testing for color. make sure you glue down the edges of the paper first then go back and give it a good layer on top.

M used paper towels and more glue on some of my fingers. This will look like scrapes or bone peeking out when done. At this point, you can choose to let it dry for an hour while you watch The Walking Dead, or you can do like we did and use a hair dryer on low to dry the paper.
 Time to get colorful:
After your application is dry through waiting or hair dryer, sponge on the grey mixture. M says don't be afraid to use your fingers for this.

Dab the color all the way to the nail tips (go lightly here).

With your fingers, start putting on the color makeups. M started with Green, then brown and finished with the flesh tone. Your hand should look like this but you can go for any shade for your own personal tastes. Experiment with color.
  Time to take a powder:
M then applied the white face powder with a brush to dry it out and give it a more defined and finished look.  M again says that she thinks baby powder works better here.
 It's all in the details:
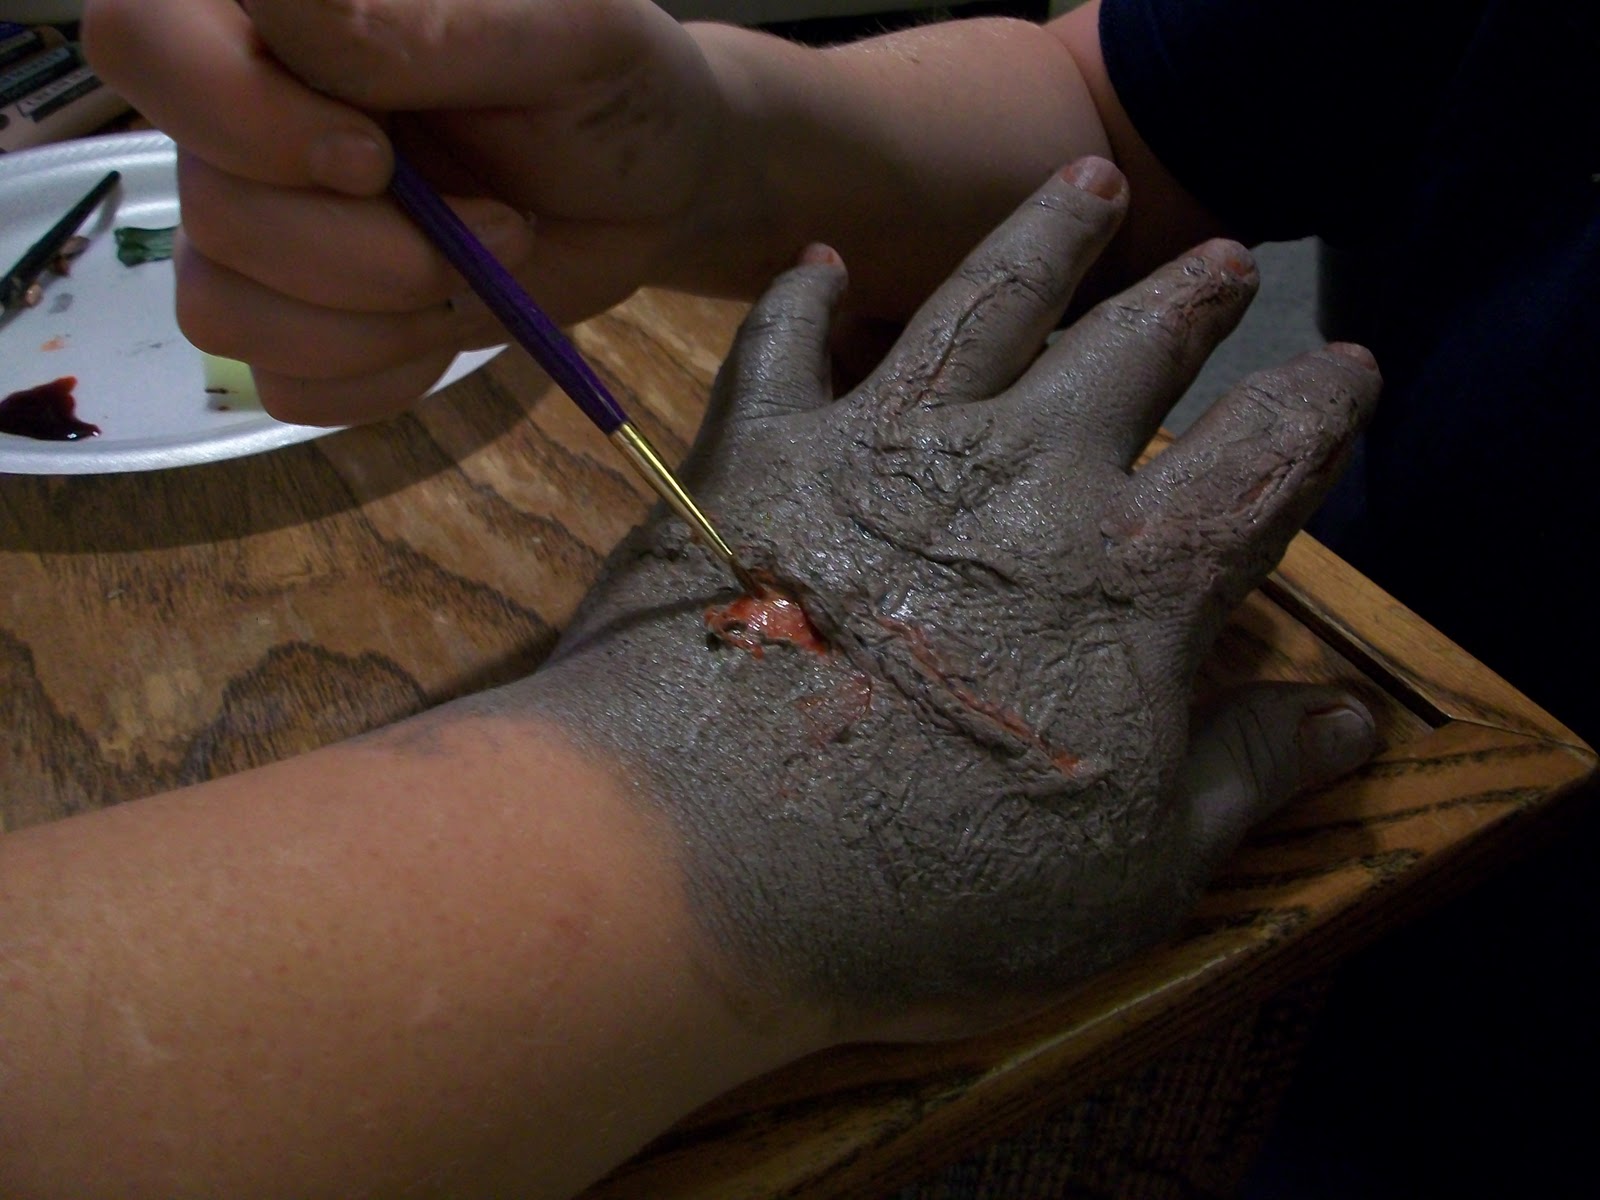
M then goes back and puts in some defining shades to make the wounds "pop".
 That's bloody good:
She takes the fake blood and paints the crevices. She also paints the blood around my cuticles and nails. As an alternative, you could paint your nails black or grey, but I think this application looks realistic.
 Why you always pickin on me?:
Take your toothpick and pick/peel some of the wound flaps up and away from the skin.

Paint in with fake blood. M says to mix a little black craft paint in to make the blood look congealed, then use a combination to make your wound look wounded.

Here is the finished product. 
It is surprisingly manuverable and comfortable. It also cleans up in a snap. 


   I hope you find this tutorial useful. Miranda makes it look as easy as painting a fence. It is certainly much more affordable than using liquid latex or other applications. I will post pictures of her makeup skills on my face for the party and Halloween night. I cannot wait to see what she does then.

   Oh, I almost forgot. The small cat in the purple Halloween T-shirt. It plays the most important part in this tutorial :
!
!
!
!
!
!
!
!
!
!
!
!
!
!
!
!
!
!
!
!
!
!
!
ZOMBIE VICTIM!